Question 2
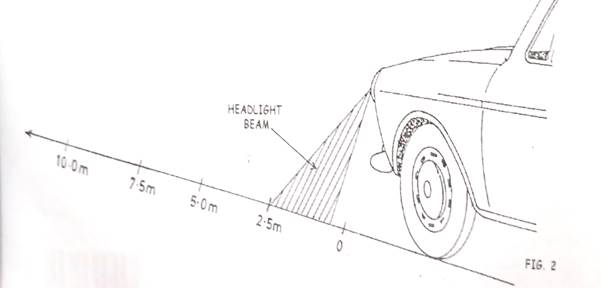
A motor vehicle user complained of short headlight coverage as shown in Fig. 2.
Use Fig. 2 to answer questions 2(a) and 2(b).

(a) State two possible causes of the fault illustrated in Fig. 2.
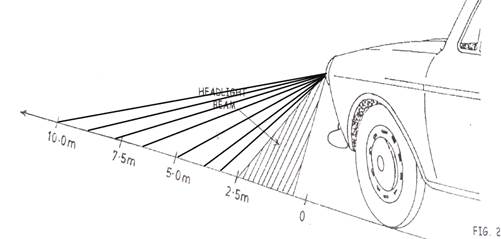
(b) Show with a sketch on Fig. 2 an appropriate coverage of the headlight beam.
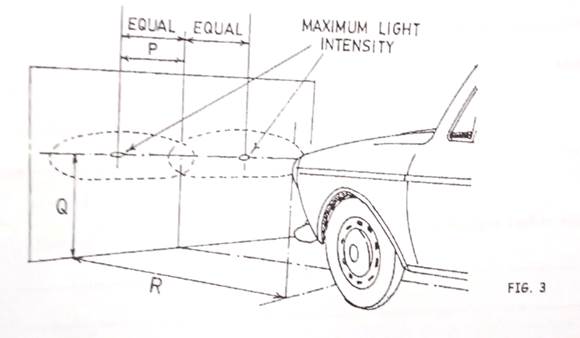
Fig. 3 shows the procedure taken by a technician, to correct the fault identified in Fig.2. Use it to answer questions 2(c) to 2(g).

(c) Name the procedure illustrated in Fig. 3.
(d) Describe the distance represented as:
(i) P;
(ii) Q;
(iii) R.
(e) List three tools required for the procedure in Fig. 3.
(f) State two precautions that should be taken before the commencement of the correction.
(g) Describe, in four steps, the procedure illustrated in Fig. 3.
(h) Table 1 contains some symptoms of fault in the lighting system of a motor vehicle.
Table 1
S/N |
Symptom of fault |
Possible cause |
Remedy |
I. |
Dim headlight |
|
|
II. |
Flickering headlight |
|
|
III. |
Headlight not glowing |
|
|
IV. |
Headlight burning out frequently |
|
|
Observation
The expected responses were:
(a) Possible causes of fault illustrated in Fig. 2
- Shifted headlamp
- Inappropriate headlamp setting
- Defective screw
- Broken/slackened adjustment
- Broken bulb retaining clip/holder
- Weak battery
- Broken headlight mounting
(b) Fig. 2 with an appropriate coverage of the headlight beam

Sketch of coverage beyond 7.5 m
(c) Headlight/headlamp alignment/adjustment/aiming/focusing
(d)(i) P – distance between the centre of the vehicle and the headlamp/focal length (ii) Q – distance between the centre of the floor and the headlamp/image height (iii) R – distance between the headlamps and the wall/screen/object distance
(e) Tools required for the procedure in Fig. 3
- Screw driver
- Spanner
- Pair of pliers
- Measuring tape
- Meter/tape rule
(f) Precautions that should be taken before the correction
- Ensure the fuel tank is at least half full
- Ensure the tyres are appropriately inflated
- Ensure the use of a flat and non-sloppy ground
- Load the vehicle according to manufacturers specification
(g) Steps for the procedure illustrated in Fig. 3
- Park the vehicle at a distance of 7.6 m from screen/wall
- Measure the distance between the centre line of the headlamp and the ground. Transfer to the screen
- Measure the distance between the centre of the vehicle and centre of headlamps. Transfer to the screen
- Adjust the vertical and horizontal screws to ensure that the focuses coincide with the markings on the screen
(h) Table 1
S/N |
Symptom of fault |
Possible fault |
Remedy |
I |
Dim headlight |
|
|
II |
Flickering headlight |
|
|
III |
Headlamp not glowing |
|
|
IV |
Headlamp burning out frequently |
|
|
Questions 2 required candidates to show an understanding of the lighting system and show familiarity with headlight alignment and common faults of the headlight. The Chief Examiner reported that majority of the candidates showed only little knowledge of the lighting system of a motor vehicle.
