Question 3
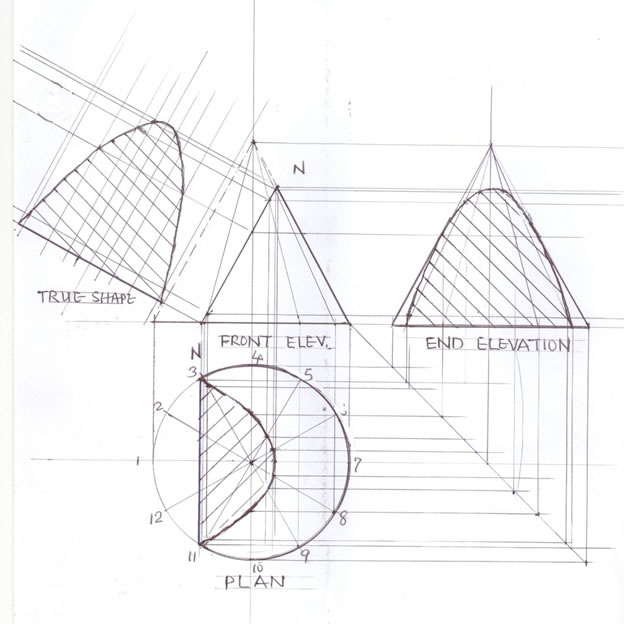
(3) The figure above shows the elevation of a cone cut by a plane NN parallel to a slant side.
Draw, full size, the following views:
(a) the given elevations;
(b) plan;
(c) end elevation in the direction of arrow P;
(d) true shape of the cut surface.
Observation
Candidates were expected to:
A. COPY THE GIVEN ELEVATION
- draw the centre line;
- draw the cone (base, height, sides);
- draw the cutting plane N – N.
B. THE PLAN
- draw the centre lines;
- draw the base circle and divide it into 12 equal parts;
- join the centre to the division point;
- project up from the division points to the base of the cone in elevations;
- join the points on the base to the apex;
- project down from the cutting plane to the radial lines on the circle;
- plot the points of intersection on the radial lines;
- join the points to complete the plan;
- hatch correctly.
C. END ELEVATION
- draw the centre lines;
- project from the front elevation;
- project from the plan (cut surface, base circle);
- plot the points of intersection;
- join the points to complete the end elevation;
- show the sides of the cone (not hatched);
- hatch correctly.
D. TRUE SHAPE
- project perpendicular lines from the cutting plane;
- draw the centre line (reference line);
- transfer corresponding ordinates from the cut surface on the plan to the reference point for the true shape;
- join the points for the curve;
- hatch correctly.
E. (i) use correct scale 1:1;
(ii) draw neatly.
The solution is shown below:


