Question 2
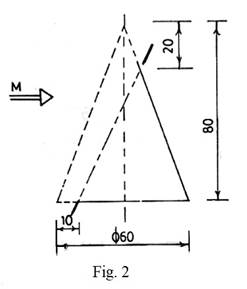
The sketch in Fig. 2 shows the elevation of a truncated right cone.

Draw, full size, the:
(a) given views;
(b) plan;
(c) end view in the direction of arrow M;
(d) true shape of the cut surface.
Observation
Most of the candidates did not attempt this question. It is believed, therefore, that they either found it hard or condered other questions easier.
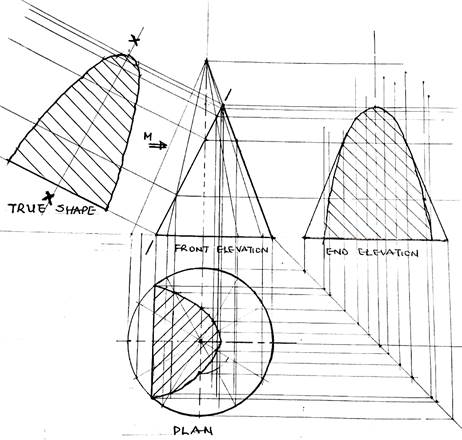
The soolution with the step-by-step requirement for the question, the lack of knowledge of which made the students not to perform well, is given below.
DRAWING THE GIVEN ELEVATION, ITS PLAN, END VIEW IN A GIVEN DIRECTION AND THE TRUE SHAPE OF ITS CUT SURFACE

MAJOR REQUIREMENTS
COPYING THE GIVEN VIEW
- Drawing of the centre
- Drawing of the cone (base, height and sides
- Drawing of the cutting plane
PLAN
- Drawing of the two centre lines of the circle
- Drawing of the base circle and dividing it into 12 equal parts
- Joining the centre of the circle to the divisional points
- Projecting up from the divisional points to the base of the cone in elevation
- Joining the points on the base to the apex
- Projecting down from the cutting plane to the radial lines on the circle
- Locating the points of intersection on the radial lines
- Joining the points to complete the plan
- Hatching
END VIEW IN THE DIRECTION OF ARROW M
- Drawing of the centre line
- Projecting horizontal lines from the cut surface from the front elevation
- Projecting from the plan (cut surface, base circle) vertically to the
end elevation - Locating the points of intersection
- Joining the points to complete the end elevation
- Hatching the cut surface in the end elevation
TRUE SHAPE OF THE CUT SURFCE
- Projecting perpendicular lines from the cut surface
- Drawing the reference line X-X
- Transferring corresponding coordinates from the cut surface on the plan
to the reference line for the true shape - Joining the points for the curve
- Hatching the true shape
Addendum
- For using the correct scale (1:1)
- For neatness and quality of line work
