Question 5
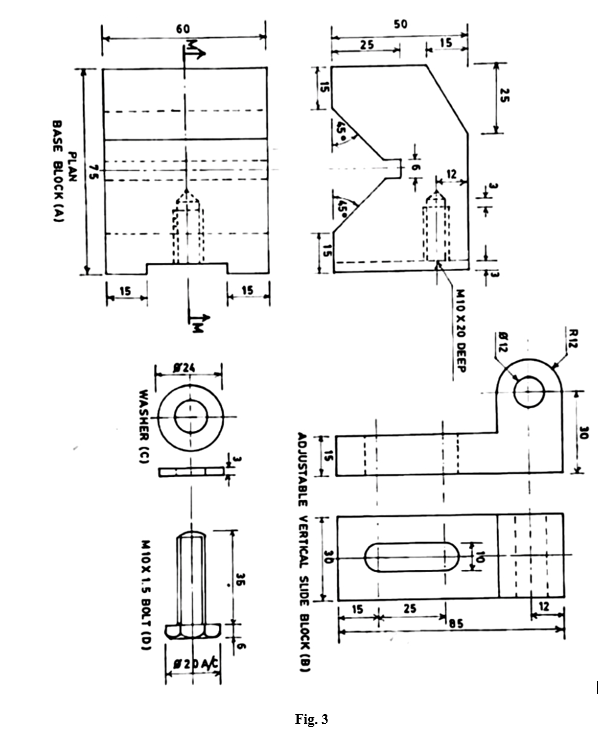
Fig. 3 shows parts of a tool setting gauge. Part B is fitted into part A with a washer (part C) and a bolt (pat D)

Draw, full size and in first angle orthographic projection, the assembly of the parts with part B at its maximum height, showing the:
(a) section front elevation on plane M-M;
(b) right end elevation;
(c) plan.
Most of the candidates avoided this question. It is believed, therefore, that the question is considered tougher than the one given under Building Drawing.
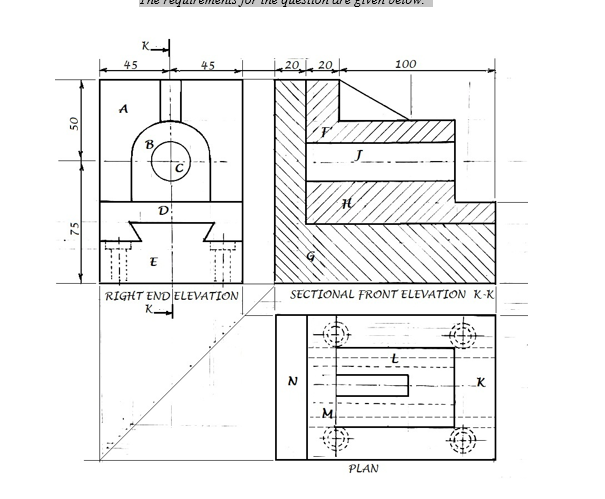
The requirements for the question are given below.


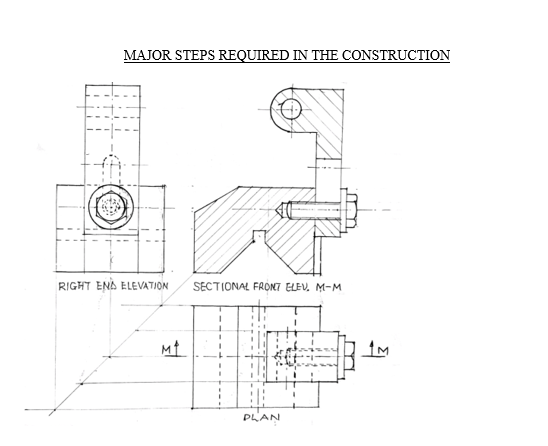
MAJOR STEPS INVOLVED IN THE CONSTRUCTION
SECTIONAL FRONT ELEVATION M-M
- Drawing 4 centre lines
- Drawing the base block (part A) as shown
- Drawing the vertical slide block (part B) with hole Ø 12
- Drawing correctly positioning part B as shown
- Drawing the washer (1mk) and bolt (3 mks) in position
- Drawing the threaded hole end
- Correctly hatching parts A in a direction
- Correctly hatching part B in a different direction from parts A
- Hatching the threaded part of the bolt
- Not hatching the slots in part A and part B
- Not hatching the washer and the bolt and threaded hole end
- Writing “Sectional Front Elevation M-M” beneath the drawing
RIGHT END ELEVATION
- Drawing 4 centre lines
- Drawing the base block (part A)
- Drawing the vertical slide block (part B)
- Correctly positioning part B
- Drawing the slot in part A
- Drawing the hexagonal bolt head
- Drawing the washer
- Drawing in hidden details 6 horizontal lines
- Drawing in hidden details, the slot in part B
- Drawing in hidden details, the threaded bolt/hole
- Writing “Right End Elevation” beneath the drawing
PLAN OF THE ASSEMBLY
- Drawing one centre line
- Drawing the cutting plane M – M
- Drawing the base block (part A)
- Drawing a vertical line indicating the bevel on the base block
- Drawing the vertical slide block (part B)
- Drawing the washer and nut
- Drawing in hidden details, the threaded part of the bolt/hole end
- Drawing in hidden details 7 vertical lines
- Writing “Plan” beneath the drawing
Addendum
- Drawing to a scale of 1:1
- Drawing in first angle projection
- Neatness and quality of linework
