
Question 3
The sketch in Fig. 3, shows the elevation of a truncated oblique cone with cutting
plane P-P.

Draw, full size, the:
- given view;
- plan;
- surface development of the cone, using TT as the seam.
Candidates’performance on this question was very impressive, with many, however, reported to have wrongly drawn the surface development of the cone using the specified seam.
The solution of the question is given below.
THE SURFACE DEVELOPMENT OF A TRUNCATED PRISM
METHOD 1

MAJOR STEPS INVOLVED IN THE CONSTRUCTION
(A) COPYING THE GIVEN VIEW
- Drawing the oblique cone (base, height, slant side)
- Drawing the centre line
- Drawing the cutting plane
(B) PLAN
- Drawing the two centre lines of the plan circle
- Drawing the base circle and dividing into 12 equal parts
- Joining the divisional points of the circle to the centre
- Projecting the divisional points of the circle to the base of the front elevation
- Joining the points to the apex V in the front elevation
- Projecting down from the cutting plane to the lines joining the vertex V from
the divisional points on the plan - Locating and joining the points into a smooth curve on plan
- Hatching the cut surface on the plan
(C) DEVELOPMENT OF TRUNCATED OBLIQUE CONE
- Drawing arcs from the divisional points on the circle of the plan to the horizontal
centre line - Drawing vertical lines from the points on the centre line to meet the base of the
elevation - Drawing lines from the base points (11, 21, 31, 41, 51) to the vertex to obtain the
true lengths - Drawing arcs using the true lengths (11, 21, 31, 41, 51 61)
- Transferring the measurement of the divisional points of the circle of the plan
for the development - Drawing the base curve on the development
- Drawing five horizontal lines on the cut surface (111, 211, 311, 411, 511,611)
to obtain true lengths of the upper cut surface of the development - Drawing radial lines from the base points of the development to the vertex
- Locating the points of the upper cut surface (111, 211, 311, 411,511,611) on the
development
- Drawing the curve of the upper cut surface
- Neatness and Quality of line work
MAJOR STEPS INVOLVED IN THE CONSTRUCTION
(A) COPYING THE GIVEN VIEW
- Drawing the oblique cone (base, height, slant side)
- Drawing the centre line
- Drawing the cutting plane
(B) PLAN
- Drawing the two centre lines of the plan circle
- Drawing the base circle and dividing into 12 equal parts
- Joining the divisional points of the circle to the centre and to the vertex V
projected from the front elevation - Projecting up from the divisional points of the base of the cone in the front
elevation - Joining the points to the apex V in the front elevation
- Projecting down the cutting plane to the lines joining the vertex V from the
divisional points on the plan - Locating and joining the points into a smooth curve
- Hatching the cut surface on the plan
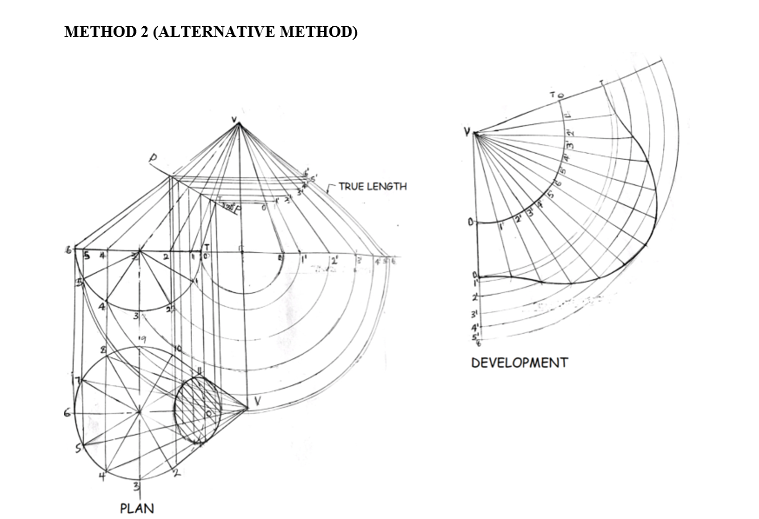
(C) DEVELOPMENT OF TRUNCATED OBLIQUE CONE
- Drawing semi-circle on the base of the front elevation
- Dividing the semi-circle into 6 equal parts
- Extending the base of the front elevation to the right
- Rebating lines (arcs) from the divisional points on the semi-circle
- Joining the points on the right-hand side of the front elevation
(0, 11, 21, 31, 41, 51, 6) to the vertex to obtain thetrue lengths - Drawing arcs using the true lengths (0, 11, 21, 31, 41, 51, 6)
- Transferring the measurement of the divisional points of the circle to the
development - Drawing the base circle on the development
- Drawing radial lines from the base points of the development to the vertex V
- Locating the points of the upper cut surface on the development
- Drawing the curve of the upper cut surface
- Neatness and Quality of line work