Question 5
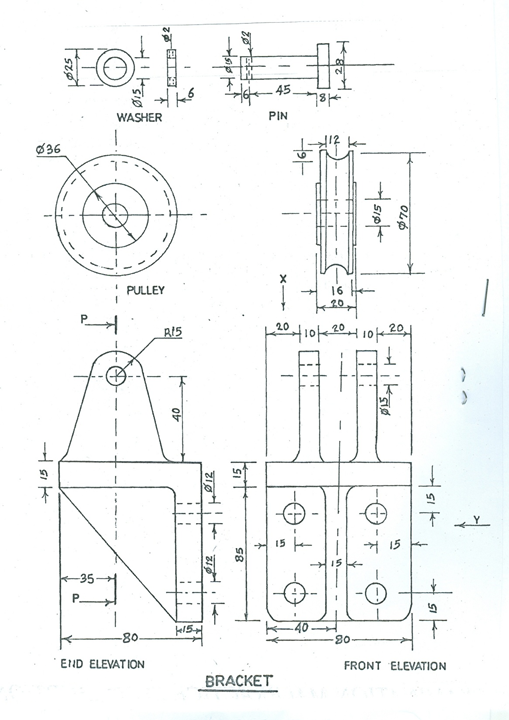
Details of a pulley assembly are shown. The pulley is held in position on the bracket by the pin from right to left. With the points assembled, draw full size, the following:
(i)end view from arrow Y;
(ii)plan view from arrow X;
(iii)sectional front elevation on P – P.

Observation
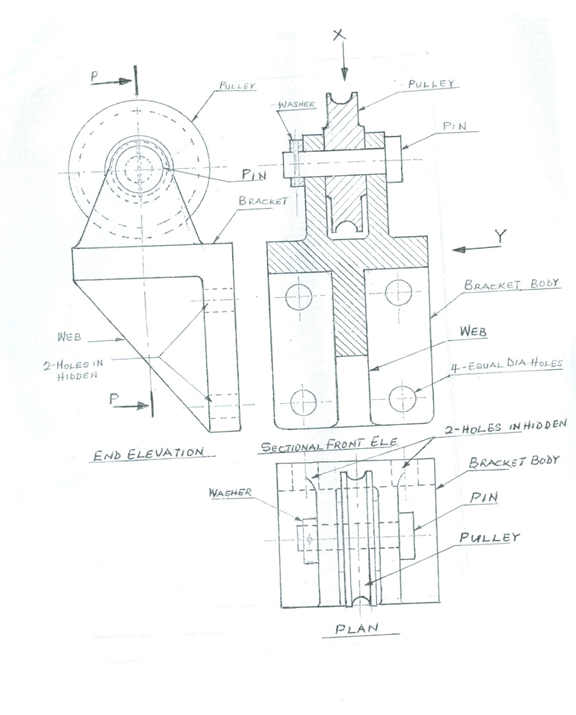
Candidates were shown details of a pulley assembly. They were asked to assemble the pulley and draw end view from arrow Y, plan view from arrow X and sectional front elevation on P – P.
Only few candidates attempted this question and their performance was fair. However most of the candidate could not section the parts properly.
Candidates were expected to do the following:
a The end view from arrow Y
(i) draw full size;
(ii) draw 3 – centre lines;
(iii) draw the outline of the assembly;
(iv) draw the bracket;
(v) draw the pulley;
(vi) draw the pin;
(vii) draw the washer;
(viii) draw 2 – holes in hidden;
(ix) draw the web;
(x) draw the cutting plane;
(xi) write end elevation.
b The plan view from arrow X
( i) draw full size;
(ii) draw 4 – centre lines;
(iii) draw the outline of the assembly;
(iv) draw the bracket;
(v) draw the pulley;
(vi) draw the pin;
(vii) draw the washer;
(viii) draw 2 – holes in hidden;
(xi) write plan view.
c The Sectional front elevation on P – P
( i) draw full size;
(ii) draw10 – centre lines;
(iii) draw the outline of the assembly;
(iv) draw the bracket;
(v) draw the pulley;
(vi) draw the pin;
(vii) draw the washer;
(viii) draw 4 – equal diameter holes;
(ix) section the bracket;
(x) section the washer;
(xi) section the pulley;
(xii) write sectional front elevation;
(xiii) draw neatly;
(xiv) show good line quality.
The solution is shown below:

